Assembly instructions cutting ring couplings
Thread types
Assembly instructions cutting ring couplings
Crimp specifications
Tube flaring according SAE J533
SAE flens Accessoires

Assembly instructions (DIN 3859-2) Cutting ring couplings
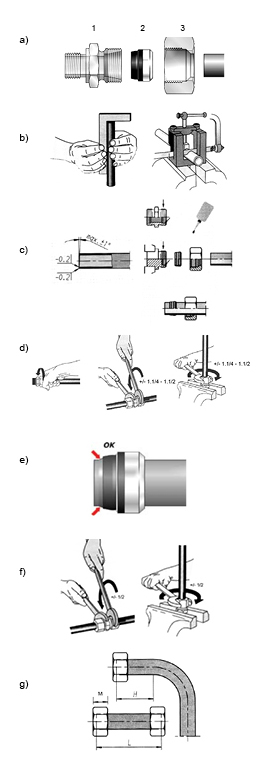
a) Cutting ring couplings include the following parts:
1) Union body
2) Cutting ring
3) Nut
The seal between the union and the tube is obtained by tightening the nut, so that the double edge cutting ring, sliding along the bevel housing of the union will uniformly cut into the tube and, at the same time, anchors between the tube and the bevel wall
Slightly debur the inside and outside of the pipe, without damaging the mating surface (max. bevel 0.2x45°), making sure to remove all the metal particles. Lubricate with oil seat, threads and double edge cutting ring. Avoid grease.
A proper assembly of the fitting is a basic condition to obtain a good performance.
b) Please, follow our assembly instructions:
Rectangulary saw off the pipe. An angular offset of 1/2° is permissible. Do not use a tube cutter because this would leave a considerable burr and an angular cut at the tube ends. Use a sawing machine.
c) Place nut and cutting ring on the endside of the pipe. Attention: to avoid a faulty assembly, be careful that the cutting edges of the ring face towards the tube end. Ensure that the thicker end of the ring is facing the nut. Insert the pipe into the union until it reaches the stop and fully tighten the nut by hand.
To avoid damage of the thread and easier assembling of stainless steel couplings, you should use “Anti-Block” grease.
d) Tighten the nut with a spanner about 1.1/4 or 1.1/2 turns, putting reference marks on nut and tube if needed. The pipe must no longer turn within the union.
Attention: for connections with pre-mounted cutting ring, solid cone and “O-ring” sealing fasten the nut maximum 1/2 till 3/4 turn.
e) Checking and reassembly
Loosen nut end inspect cut, checking the penetration of the cutting edge. The ring may rotate now. If the cut is not uniform, repeat the operation, tightening further.
Every time the fitting is disassembled and subsequently reassembled, the nut must be re-tightened with the same force as used for the initial installation.
The ends of dismantled pipes must be refitted to the same unions used for the tightening procedure.
f) For final assembly of all the prefitted unions, after appropriate lubrication screw the prefitted nut by hand onto the body of another union until the point of resistance is met, then tighten by a further 1/2 turn.
g) Minimum lenght (H) of straight pipe in elbows: at least twice the thickness of the nut (M).
Minimum lenght (L) of the pipe between two unions: at least 2.5-3 times the thickness of the nut (M).
Contact
 Driehoekstraat 18
4706 PR te Roosendaal
The Netherlands
 +31 (0)165 85 20 50
 +31 (0)165 85 20 55


